小编写这篇文章的主要目的是为了分享过去自己的开发经验,因为自己在开发的过程中曾经接受过很多开源软件的帮助,现在这是转入正题。
涉及字节流数据通信,必然要涉及通信协议。鉴于当时的开发需求,博主仅对D寄存器的读写协议分析过。其他寄存器理论上是相似,有兴趣的同学可以自行分析数据进行测试。
D寄存器的通信协议相对比较简单,主要可以分为:
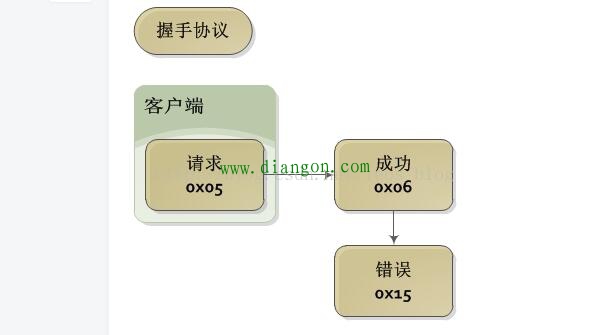
1.问候应答协议
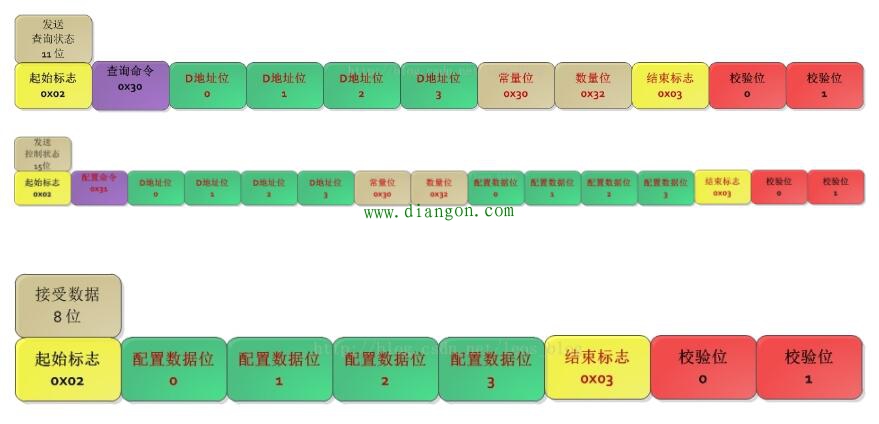
2.状态查询协议
3.状态配置协议
4.数据反馈协议


在PLC通信过程中主要的三个难点在于寄存器的加密解密,数据信息加密和解密,以及字符的校验。
寄存器地址加密过程:
《span style=“font-size:18px;”》void PLC_dataparse::Encrypt_toPLCaddress( BYTE *parray , const UINT paddress )
{
int encode_address = 0x1000 + paddress * 2;
BYTE encrypt_key = encode_address & 0xf;
parray[3] = (encrypt_key《10) ? (encrypt_key + 0x30) : (encrypt_key + 0x41 - 0xa);
encrypt_key = (encode_address 》》 4) & 0xf;
parray[2] = (encrypt_key《10) ? (encrypt_key + 0x30) : (encrypt_key + 0x41 - 0xa);
encrypt_key = (encode_address 》》 8) & 0xf;
parray[1] = (encrypt_key《10) ? (encrypt_key + 0x30) : (encrypt_key + 0x41 - 0xa);
encrypt_key = (encode_address 》》 12) & 0xf;
parray[0] = (encrypt_key《10) ? (encrypt_key + 0x30) : (encrypt_key + 0x41 - 0xa);
}
《/span》
数据信息的加密过程:
《span style=“font-size:18px;”》void PLC_dataparse::Encrypt_toPLCcontent( BYTE * parray , const UINT pcontent )
{
BYTE encrypt_key = pcontent & 0xf;
parray[1] = (encrypt_key《10) ? (encrypt_key + 0x30) : (encrypt_key + 0x41 - 0xa);
encrypt_key = (pcontent 》》 4) & 0xf;
parray[0] = (encrypt_key《10) ? (encrypt_key + 0x30) : (encrypt_key + 0x41 - 0xa);
encrypt_key = (pcontent 》》 8) & 0xf;
parray[3] = (encrypt_key《10) ? (encrypt_key + 0x30) : (encrypt_key + 0x41 - 0xa);
encrypt_key = (pcontent 》》 12) & 0xf;
parray[2] = (encrypt_key《10) ? (encrypt_key + 0x30) : (encrypt_key + 0x41 - 0xa);
}
《/span》
添加校验码:
《span style=“font-size:18px;”》void PLC_dataparse::Add_checkcode( BYTE * pdest , BYTE * psrc , const UINT plenth )
{
int sumtemp = 0;
for ( unsigned int i = 0; i《 plenth; i++)
{
sumtemp += (*(psrc + i));
}
BYTE encrypt_key = sumtemp & 0xf; // get low 4 bit
pdest[1] = (encrypt_key《10) ? (encrypt_key + 0x30) : (encrypt_key + 0x41 - 0xa);
encrypt_key = (sumtemp 》》 4) & 0xf; // get high 4 bit
pdest[0] = (encrypt_key《10) ? (encrypt_key + 0x30) : (encrypt_key + 0x41 - 0xa);
}
《/span》
提取数据信息:
《span style=“font-size:18px;”》double PLC_dataparse::Get_content( BYTE *parray , UINT plenth )
{
BYTE dl_data[4];
BYTE pre_data[4];
double pow_numb;
for (int j = 0; j《4; j++) //剔除杂码
{
pre_data[j] = parray[j + 1];
}
//////////////////////////////////////////////////////////////////////////
dl_data[1] = (pre_data[0]《0x40) ? (pre_data[0] - 0x30) : (pre_data[0] - 0x41 + 0x0a);
dl_data[0] = (pre_data[1]《0x40) ? (pre_data[1] - 0x30) : (pre_data[1] - 0x41 + 0x0a);
dl_data[3] = (pre_data[2]《0x40) ? (pre_data[2] - 0x30) : (pre_data[2] - 0x41 + 0x0a);
dl_data[2] = (pre_data[3]《0x40) ? (pre_data[3] - 0x30) : (pre_data[3] - 0x41 + 0x0a);
for (int i = 0; i《4; i++)
{
dl_data[i] = dl_data[i] & 0xf;
}
pow_numb = dl_data[3] * pow(16.0, 3.0) + dl_data[2] * pow(16.0, 2.0) + dl_data[1] * 16 + dl_data[0];
return pow_numb;
}
《/span》
校验接受数据校验码:
int PLC_dataparse::Check_checkcode( BYTE *parray , UINT plenth )
{
int error_code = PLC_SUCCESS;
const int legal_lenth = 8; //the define legal lenth
if (plenth != legal_lenth)
{
error_code = PLC_CRCERROR;
return error_code;
}
//////////////////////////////////////////////////////////////////////////
//check code
else
{
BYTE *pbyte = new BYTE[2];
// split out head mark , tail check out
Add_checkcode(&pbyte[0], &parray[1], plenth - 3); //calculate the check code
for (int j = 0; j《2; j++)
{
if (pbyte[j] != parray[plenth - 2 + j])
{
error_code = PLC_CRCERROR;
break;
}
}
// release the pointer and it‘s stack
delete pbyte;
pbyte = NULL;
return error_code;
}
}
上述代码是使用PLC窗口通信的最大的难点。一旦掌握几大难点,基本PLC的串口通信就很简单了。
另附上一份当时自己开发的三菱plcD寄存器调试程序。
备注:该调试工具仅支持xp系统
